I already know what I'm going to be! :D Details to come. Meanwhile, I got orders to fill. Hooray!!!!!!
Tuesday, August 16, 2011
Teething Woes and Halloween
I noticed Ezra had one new tooth the day before his birthday. I found out today that that tooth is definitely a molar--the one behind the canine. The back side is pushing through, leaving a strip of gum along the biting surface of the tooth that is yet to be broken through. Poor guy. And he has his two lower secondary incisors coming in, saw those just last night, in fact. I'll miss his little smile with just the two bottom teeth, and how he sometimes pushes his lower jaw forward so the two teeth are over his upper lip. Aww. But, all these new teeth would explain why he's been so grumpy and teary. Today, for example, my whole to-do list was shot. No groceries (thank goodness my husband covered for that), 3 Etsy orders on hold, a grumpy baby who refused to sleep all day. It was definitely challenging, but after the attempt at his second nap, we pulled out his foam blocks and I had fun building little villages and alien fortresses. He had fun grabbing random pieces and toppling whole buildings and pulling all the blocks out of their container as I tried to show him how to clean up. And from that, my Halloween plans were born. A little Googling solidified my plans and designs and I'm so excited to get started. Halloween has always been my favorite holiday, and I typically plan my costume all year long. (Well, not the last few years, they've been a little crazy. Thank goodness for my Harry Potter robe I made in clothing design class in high school, haha.) Jason told me that I can get started on Halloween in August, to which I said and say, "Psh! He'll fit this 18 month hoodie even in 2 months." Plus, who knows how long this will take me. I'm keeping it simple but awesome, but I do think that, with my domestic duties and shop maintenance, it will take me the bulk of the next 2 1/2 months. The exciting part is, Ezra's costume has the thematic landscape to supply Jason's and my costumes, too! I'm not huge on family/themed Halloween at ALL. So we'll see what I can do to make our costumes subtle, amazing, non-corny, and awesome.
Friday, August 12, 2011
weaselby's is now on facebook!
Hooray! I finally figured out how to publish my Etsy facebook page. Still learning all the linking, so here we go! Find me on facebook :p And, of course, on Etsy: weaselby.etsy.com I just posted all the pirate party goodies.
Thursday, August 11, 2011
Winning Recipes of the Week
I've decided to post recipes I try that turn out reeeeeally good. Here we go:
Honey Mustard Chicken--slow cooker
4 boneless skinless chicken breasts
3/4 cup dijon mustard (I used spicy brown)
1/4 cup honey
Place chicken in slow cooker. Mix honey and mustard in separate bowl, pour over chicken. Cook 8 hours on low. I cooked mine on high for just under 4 hours. (Note: I never cook in my slow cooker on low, ever since our first roast that ended up as a shriveled bit of jerky. I cook for around 4 hours on high, everything always cooks thoroughly while staying tender and juicy.)
Green Bean Casserole
With the chicken, I made a cheesy variation of green bean casserole, with generic brand low sodium cream of mushroom soup and frozen beans for more flavor, texture, and nutrients:
1 can (10 3/4 ounces) Campbell's® Condensed Cream of Mushroom Soup (Regular, 98% Fat Free or Healthy Request®)
1/2 cup milk
1 teaspoon soy sauce
Dash ground black pepper
4 cups cooked cut green beans
1 1/3 cups French's® French Fried Onions
- Stir the soup, milk, soy sauce, black pepper, beans and 2/3 cup onions in a 1 1/2-quart casserole.
- Bake at 350°F. for 25 minutes or until the bean mixture is hot and bubbling. Stir the bean mixture. Sprinkle with the remaining onions.
- Bake for 5 minutes or until the onions are golden brown.
TIPS:
Easy Substitution: Use 1 bag (16 to 20 ounces) frozen green beans, thawed, 2 packages (9 ounces each) frozen green beans, thawed, 2 cans(about 16 ounces each) green beans, drained or about 1 1/2 poundsfresh green beans for this recipe.
Flavor Variation: For cheese lovers, stir in 1/2 cup shredded Cheddar cheese with the soup. Omit the soy sauce. Sprinkle with an additional 1/4 cup Cheddar cheese when adding the remaining onions.
Homemade Macaroni and CheeseAgh, sorry, all the pasting and alien formatting has messed things up. Anyways, last recipe, for homemade MACARONI!!! It's as good as what you hope to get when you order macaroni from a restaurant:
http://allrecipes.com/recipe/traditional-macaroni-and-cheese/detail.aspxIngredients
Directions
ENJOY!BEST. EVER. I didn't mess with the whole evaporated milk/water thing because that seemed sill to me, so I did it all with milk, which work out to be 2 1/2 cups of milk.
Anatomy of a First Birthday: The Recipe, The Aftermath
Yay!!!! The birthday party was a huge success. For the 1 hour and 45 minutes that we were all outside at the pool, we experienced the coolest temperatures in 2 weeks. It got hot again at 5 pm. What are the odds?! There was a nice breeze (that tangled up the awesome red and black foil helium balloons, sadly) and cloud coverage. Gorgeous. EVERYONE came! All 14 parents and 9 kids :D I've decided that, after this experience, great parties are made by great guests. Our party was AWESOME, because we had awesome guests. Seriously. We're so lucky to have such cool people for friends.


So, to solve the favor-handing-out conundrum, I just told everyone what the deal was when they came: your bag is in the chest, it has your child's name on it, you get to pick your parrot, and don't forget the chocolate coins that are in the cooler with our 72 bottles of water. Lots of people went ahead and put the parrot of their choice in their bag right then, which worked very well. About an hour and 15 minutes into the aquatic festivities, there was a gradual and natural shift from the pool to the gazebo, so Jason ran back for the Party Pail of ice cream, we dished everyone up, lit Ezra's cupcake candle, sang, and enjoyed eating. We all ate at our leisure for a while, then kids' patience began to wane, so everyone headed out (with their bags and coins), making for a grand total party time of 1 hour 45 minutes. It was AWESOME.
Highlights:
One family came with everyone, Mom, Dad, and 6-month-old son, in eye patches :D
Our youngest guest, a one-month-old, had the most clever costume EVER. Seriously, if I were creative and genius enough to have thought of this, it would have been Ezra's Halloween costume last year. They had him in a white onesie with the sleeves cut off, black Sharpie stripes drawn on it, and the best part: knit pants with one leg rolled up and the other tied at the ankle, making him a pegleg! Man. That was awesome.
Watching Ezra's one friend have a blast with her mom tickling her neck with her new pink parrot :D
Having adult guests say that the healthy cupcakes were good! And watching the young guests devour them :)
Getting nice feedback about how the kids are still digging their parrots/getting requests for the recipe...which leads us to...
THE RECIPE!
Healthy First Birthday Cake Recipes - Sugar Free Applesauce and Banana Cake
8 oz (2 cups) whole wheat flour
1 tbspwheat germ
1 heaped tsp baking soda
1 tsp cinnamon (optional)
6 medium, ripebananas- mashed
8 fl oz (1 cup)sugar-free applesauce
2-4 fl oz (1/4 to 1/2 cup) soy milk
Preheat the oven to 325 deg F (160 deg C).
In a bowl, combine the flour, wheat germ, baking soda and cinnamon.
In a separate bowl, combine the applesauce with the mashed bananas and 1/4 cup milk.
Pour the applesauce mixture into the bowl with the dry ingredients and mix thoroughly. If the mixture seems dry, you can add up to another 1/4 cup milk.
Pour into a greased 9" x 9" square or 9" round pan and bake for around 1 to 1 1/2 hours. The cake is ready when a sharp knife inserted into the middle comes out clean.
Read more:http://www.homemade-baby-food-recipes.com/healthy-first-birthday-cake-recipes.html#ixzz1UkWRKi4Z
I did mine as cupcakes, shown below. I baked them for 24 minutes. I used pirate cups from Hobby Lobby, which unfortunately looked nice but performed very poorly. The cupcakes fused with the paper. :s


I left a few unfrosted to make it possible for younger/milk-allergic guests to enjoy. Here's the frosting recipe. I think I may have used a juice concentrate that was too strong...my husband liked it but accurately described it as "a kick in the teeth." I think I could have whisked it for longer, too...the longer it's whisked, the thicker it seems to get. All in all, a very cool recipe:
http://www.homemade-baby-food-recipes.com/sugar-free-frosting.html I used the Apple and Cream Cheese Frosting recipe. I went ahead and just linked it because there are a lot that are cool. It's a great website.
And here are a few pictures from the day:


We went to Red Lobster with a gift card that night and they gave him his first scoop of ice cream :) We opened presents afterwards and had a grand ol' time. (Actually, I'm kind of nervous to watch the video we took of "him" opening presents...it was a lot of, "Ezra, look at this, now that, oh, that too, stop playing with that toy and look at this card..." In hindsight, since it was so late, we probably should have done presents and cards the next day. :s )
Whew. Now on to thank-you notes. And cleaning the house, lol, which I put off while prepping for the party for the two weeks before. I tell ya, I'm tired. But it was totally worth it! :)
Oh, and for your use and viewing pleasure, here are some of the links I used while brainstorming and planning the party:
Saturday, August 6, 2011
Anatomy of a First Birthday: The Favors
So, like I said in the last post, I decided to put pirate stickers, chocolate coins, a child-sized eye patch, and a stuffed parrot in each brown paper lunch sack. It took forever to find a parrot pattern, but here's the one I used--it's FANTASTIC.

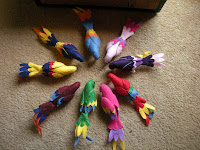


I altered my pattern a bit, to make it more baby-friendly: I cut all of my pieces out of felt (no feathers) and omitted the feet/safety pin (although the parrots ARE the perfect size, they would be so cute pinned to little kids' shoulders, if that were safe :p ). I also didn't have time to make a "beak sock" and white mask around the eyes for each parrot, so I just hole punched pieces of black felt and glued them on my parrots. I didn't do feather stitch detailing on each bird, but I still think they turned out nice. If I'd had time, I may have done the stitch detailing.

We have 8 little guests coming, so I made 9 parrots, because I want Ezra to have one as a memento from his first birthday :) I picked the color combinations to make each parrot unique, because I'm planning on having each child or parent pick their own parrot. Four of the kids are girls, so I made 2 overtly girly parrots (pink and purple) and one in the more subdued feminine hues of dark purple and pink, so there's enough girliness without planning on each girl being in love with pink. I Googled a few macaws at the beginning to get me going on color schemes, so a few of these guys are pretty realistically colored, and I like that. :)
Next, eye patches. I cut a general shape/size out of black felt and held it up to Ezra's face to gauge the appropriateness. I ended up trimming a lot, and ended up with with a patch about 1 7/8" across and 1 1/2" top to bottom, with bottom corners rounded. I cut some yarn and measured Ezra's head, leaving enough slack to be able to tie it in a bow around his head (if he cooperates. I'm not expecting any of the patches to be worn, but they look cute and it's fun to picture.) I cut about 34" of yarn for the smaller kids, and 36" for the older kids. I straight stitched it (by hand, the machine wouldn't handle this very well, I don't think) to the top edge of the patch. Viola!
Then I typed each child's name into a Word document in Blackadder size 72 and drew each name onto a bag. Here's what the favor bags look like:

I filled each bag with the patch and the stickers, lined them up in the chest, and hung the parrots along the front of the chest, like so:


Keeping it secret:

Chocolate coins are chilling in the fridge. We'll put them in the cooler with the chilled water bottles so they don't melt in the heat (did I mention that this has been the hottest week of the summer??), and guests who want them can add them to their bags on the way out.
The only tricky thing I haven't quite figured out is when to give the guests their bags. I don't want any kids demanding to take their parrots into the pool...hmmm. I'll keep you all updated.
Bottom line:
Parrots:
3 colors of felt, using just under 2 sheets for each parrot (you can use the same colors for multiple parrots): $0.50
Stuffing: You can get a small bag for about $3 and probably won't use it all
Eye patches:
1 sheet of black felt, $0.25 for all 9
Yarn: $2.79 a skein, but you'll have a ton left over for other projects (I already had this in my materials)
Stickers:
From Target, $4 a package/4 sheets a package (by far my biggest splurge)
Lunch sacks:
About $0.02 each
Chocolate coins:
$0.99 for a bag of 7 (I bought 5 bags, so each guest is getting 4, with three left for us)=$4.95
Total per bag: About $2.61
Friday, August 5, 2011
Anatomy of a First Birthday: The Favor Box
I'm coming back to proofread this, I kind of just threw it out there. I'll look over it again next week to make sure it actually makes sense, when his birthday is over and I have time. :)
The Story:
Since I'm not spending a ton on decorations or activities, I wanted to put an effort into the favors that the guests will take home. After much Googling for ideas and deliberation, I decided to gowith pirate stickers, some chocolate coins (for the parents, in about 50% of the cases), a little stuffed parrot, and a kid-sized eyepatch.


Since I'm not spending a ton on decorations or activities, I wanted to put an effort into the favors that the guests will take home. After much Googling for ideas and deliberation, I decided to gowith pirate stickers, some chocolate coins (for the parents, in about 50% of the cases), a little stuffed parrot, and a kid-sized eyepatch.
Alright. Sweet. Now...what do I use for a favor bag? I considered your standard clear plastic favor bags, but since the invitations and the favors are really the only things that will end up being pirate-themed, I wanted to go a little more...thematic. I considered making little treasure chests for each guest out of brown craft foam, but the foam is too thin for me to imagine successfully gluing it together. (Thinking back just now, I suppose I could have done interlocking pieces, with tabs and holes...but trying to figure it out gives me a headache right now lol.) I considered buying small wooden treasure chests from Hobby Lobby, but even a much-too-small chest was too pricey. Since I was going to buy so many lunch sacks for the invitations, I decided to just use a bag per child and write their names on it with Sharpie, using the Blackadder font as my model. But I needed a good presentation still...instead of a bunch of little chests, why not out all the favor bags in one BIG chest? One big chest made out of the (free) box Grandma used to ship Ezra's birthday present!
The How-To:
Materials Needed:
Box (try to get one of thin cardboard that is easily bent)
Brown paper box tape (not plastic)
Brown craft paint (and brush--preferably a broad one)
Scissors (and maybe a box cutter)
Yardstick
Pencil
For extra bling:
Black or yellow Duck Tape
Brown Sharpie
Jute/hemp
Hole puncher
Directions:
1. Measure and cut: Decide how big you want your chest to be. I wanted mine to be 18x20", keeping the height at the 8.5" the box already was. Open all the flaps on the box, pull off any tape (if you mar the cardboard, that's ok, it'll add to character later), and cut the box at one corner so that it lays flat. Since my box required modification to 2 sides, I went ahead and cut all the sides apart, measured 2 sides and marked them at 18" and the other 2 at 20". In the picture below, my two 18" shorter sides are on the left, the longer 20" sides are on the right.
2. Assemble and tape: Decide which flaps you want to use for the bottom and which for the top. You'll need to cut the two bottom flaps of the long sides of the chest so that when they're folded together, they're each half of the shorter sides. For example, I cut my two short sides to 18", and the box was originally 20x20". So I had to cut 1" off of each of the bottom flaps of the long sides (the 20" sides) so that the flaps would each measure 9", so that they would fold neatly and measure 18", the length of the short side. (I'll work on getting a diagram to illustrate.)
Tape the edges of all sides so you end up with a box with both ends open. To make it easier, you can lay the sides flat, side by side, so that you can tape all the edges and then stand it up when you tape the last edge. Tape the bottom flaps closed. Now you have a modified box with an open top. DO NOT CUT THE TOP FLAPS. (Note: I made my lid before taping the box together, as you can see in the pictures. I think it would have been easier to do it the way I'm describing, hence, why I'm describing it this way :) )
3. Craft the rounded top: Round both of the top flaps of the longer sides by rolling the cardboard. I had to hold the cardboard down and put pressure on it with one hand while pulling up with the other hand to break it down a bit.

Cut one flap off the box completely and tape it to the attached flap.
Now you have a box with a great rounded treasure chest top!

4. Trace and cut the side flaps: Use two or three pieces of tape to tape the front of the lid to the front side of the chest to hold it in place while you mark the sides of the lid. Turn your chest on its side and use your pencil to trace where the lid is on the side flaps.

Cut on your drawn line and tape the new curved side to the top of the lid. Then cut the flap where it is attached to the box. Do the same on the other side. (I taped my lid on the inside with lots of small pieces, because the curve makes one big piece hard to do.)
5. Paint: Use your brown craft paint to paint your box. Use a dry brush kind of technique for more texture. And then your basic chest is done!

These are to give your chest a little more character:
6. Metal work: Cut pieces of black Duck Tape and line all the edges of your chest. I just used one piece for each edge, folding it so that one half was on each side. I also used it on all the raw edges of my chest, except for the sides of the lid, because the sides of my lid were too short and the tape would have covered all the "wood." Put two pieces (mine are about 3") on the back fold for hinges. I also cut a keyhole out of tape and put it in the center of the front of the chest. You can also cut handle shapes for the sides.
7. Woodgrain: Google pictures of woodgrain and draw your woodgrain with your brown Sharpie. To avoid the stark "contour map" look, you can do a thin layer of paint over the Sharpie, or you can shade it with pencils, crayons, paint, whatever your creative instinct demands.

8. Lid support: As I worked with my chest, it started to open more than I wanted. So I punched holes in both sides of the lid and directly below those holes in the sides of the chest, about 3-4" from the back of the chest. I opened the chest as far as I wanted it to open, cut 2 lengths of jute, fed them through the holes, and tied a single knot in each end (on the outside of the chest). Now it won't open more than I want it to, and it will keep it's chest-like look even when it's open.

I think you need to look close to see the jute, but here's how the display has turned out, with the bags and parrots. Posts on how to make the parrots and what's inside the bags coming.
I'm very pleased with how it all turned out! I put enough work into it that I'm going to keep it as a toy chest for as long as it holds up...which I'm anticipating will be a good long while, considering all the Duck Tape I used, lol.
The Bottom Line:
$3.79 for Duck Tape--but I only used about $.75 of it, max.
Box--free
Jute--I used maybe 0.005 of a cent from my supplies
Subscribe to:
Posts (Atom)